Vesper's Host
- Fireteam
- 1–3 players
- Released
- Oct 2024
- Location
- Reef Station
Overview
Board a derelict BrayTech station and use Scanner, Operator, and Suppressor augments to move nuclear cores, dismantle Raneiks Unified, and defeat the Corrupted Puppeteer.
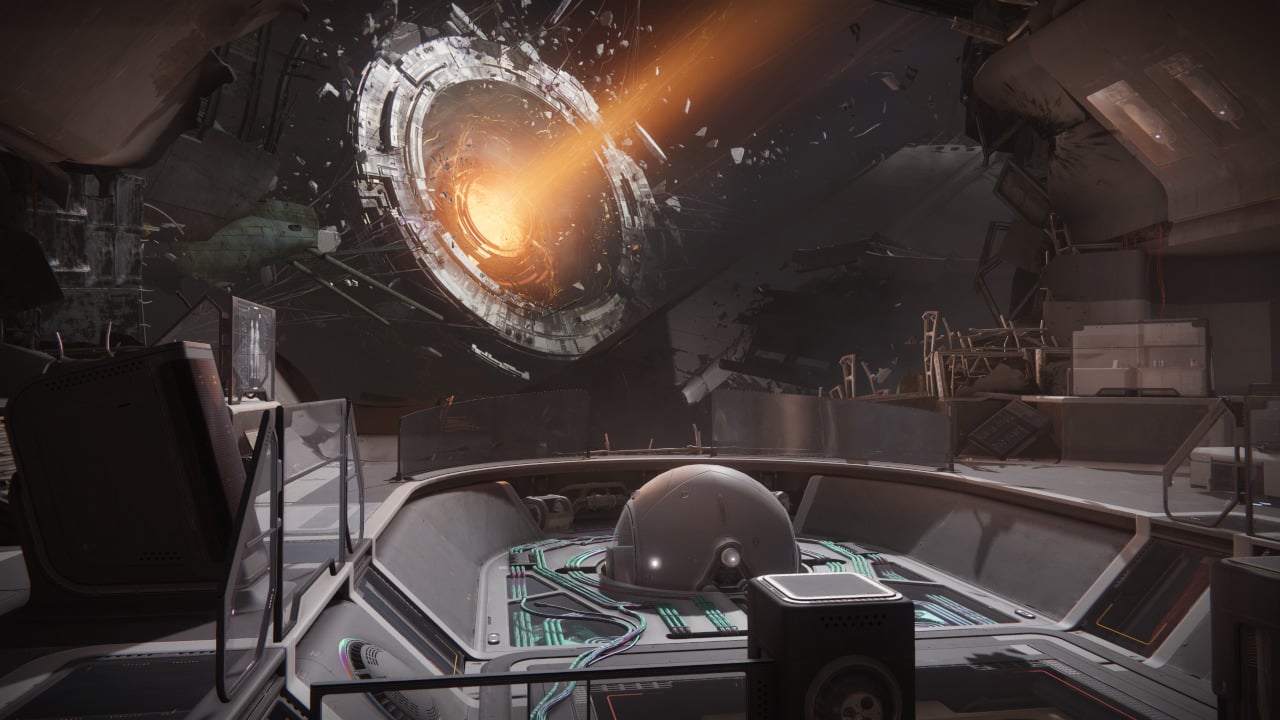
Three augments drive every encounter: Scanner identifies safe panels, Operator shoots them to spawn nuclear cores, Suppressor drops decoy clones. Radiation stacks while you carry a nuke — at 10 stacks the carrier dies.
Guide
Fallen research station. Mechanics center on three augments: Scanner (identifies safe/active panels), Operator (shoots panels to spawn nuclear cores), and Suppressor (spawns decoy clones to disrupt enemies). Radiation stacks are a constant threat — accumulating 10 stacks kills the player carrying a nuke.
Encounter 1 — Activation
Collect Scanner and Operator augments from Viral Carriers. Scanner identifies safe panels on your radar. Operator shoots those panels to spawn nuclear cores. Carry three nukes back to the starting room for deposit.
If a panel disappears from the Scanner player's radar, it is dangerous — do not shoot it. Only shoot panels that remain visible on radar.
Defeat Brigs in the arena to remove the shielding on nuke deposit buckets. You cannot deposit nukes until the bucket shielding is gone.
Radiation stacks accumulate while carrying a nuke. At 10 stacks, you die. Deposit nukes quickly and rotate carriers if stacks get high.
Any player reaches 10 Radiation stacks while carrying a nuke — instant death.
Encounter 2 — Integration
Collect nukes and deposit them into numbered buckets in sequential order. A Power Reserves charge opens and closes doors via Fallen terminals. Raneiks Unified roams the halls during this encounter, dropping Servitors and performing the Integration wipe mechanic.
Raneiks's Integration attack connects beams to all visible players simultaneously. If beams connect without obstruction, the entire team wipes. Break line-of-sight behind walls or pillars immediately when Integration begins.
Designate a nuke carrier who watches Raneiks's position. When Integration begins, the whole team hides — deposit can wait.
Integration beam connects to any player without obstruction — full team wipe.
Boss 1 — Raneiks Unified
Identify four correct panels from nine available. Defeat the Machine Priest to access the upper level, then use the Suppressor augment.
Use the Suppressor augment's grenade ability to spawn a decoy clone near Raneiks. Destroy the decoy to shatter Raneiks into constituent Servitors. Find the two Servitors with extra lights glowing on their faces — these two give you numbers. Repeat twice to collect four numbers total. Activate the four corresponding panels to trigger the 25-second DPS window.
Call out Servitor face markings immediately when they scatter — you have a short window to identify the correct two before they reunite. Solar Titans with Consecration and weapons like Dragon's Breath or Parasite excel during the brief DPS windows.
Shooting incorrect panels resets the encounter. Double-check with the team before confirming panel activation.
Running out of DPS phase time repeatedly without killing Raneiks triggers enrage.
Boss 2 — Corrupted Puppeteer (Final Boss)
All three augments cycle throughout this encounter. The Corrupted Puppeteer is immune until specific mechanics are completed. Learn the starting room's numbered buttons before you pull — see the Observation and Control top-floor map.
Suppressor creates decoy clones near Broken Puppets to remove the boss's immunity shields. Scanner identifies which puppet copy to destroy — the copy turns white on radar, that's the target. Operator activates wall panels. Deposit two nukes into buckets to remove the boss's final immunity layer before the DPS window opens.
During the DPS phase, a unique Broken Puppet spawn drops a nuke. Deposit that nuke into the left bunker when the boss goes immune — this is required for the next DPS phase to open. Weapons like Lost Signal, Anarchy stacking, or Edge Transit god rolls work well for sustained damage.
Each augment must be passed and used in the correct order. A missed augment handoff means the immunity cycle resets.
Excessive Radiation stacks during nuke carry — instant death. Lightning damage during boss DPS phase if mechanics are skipped — team wipe.
Maps & Callouts
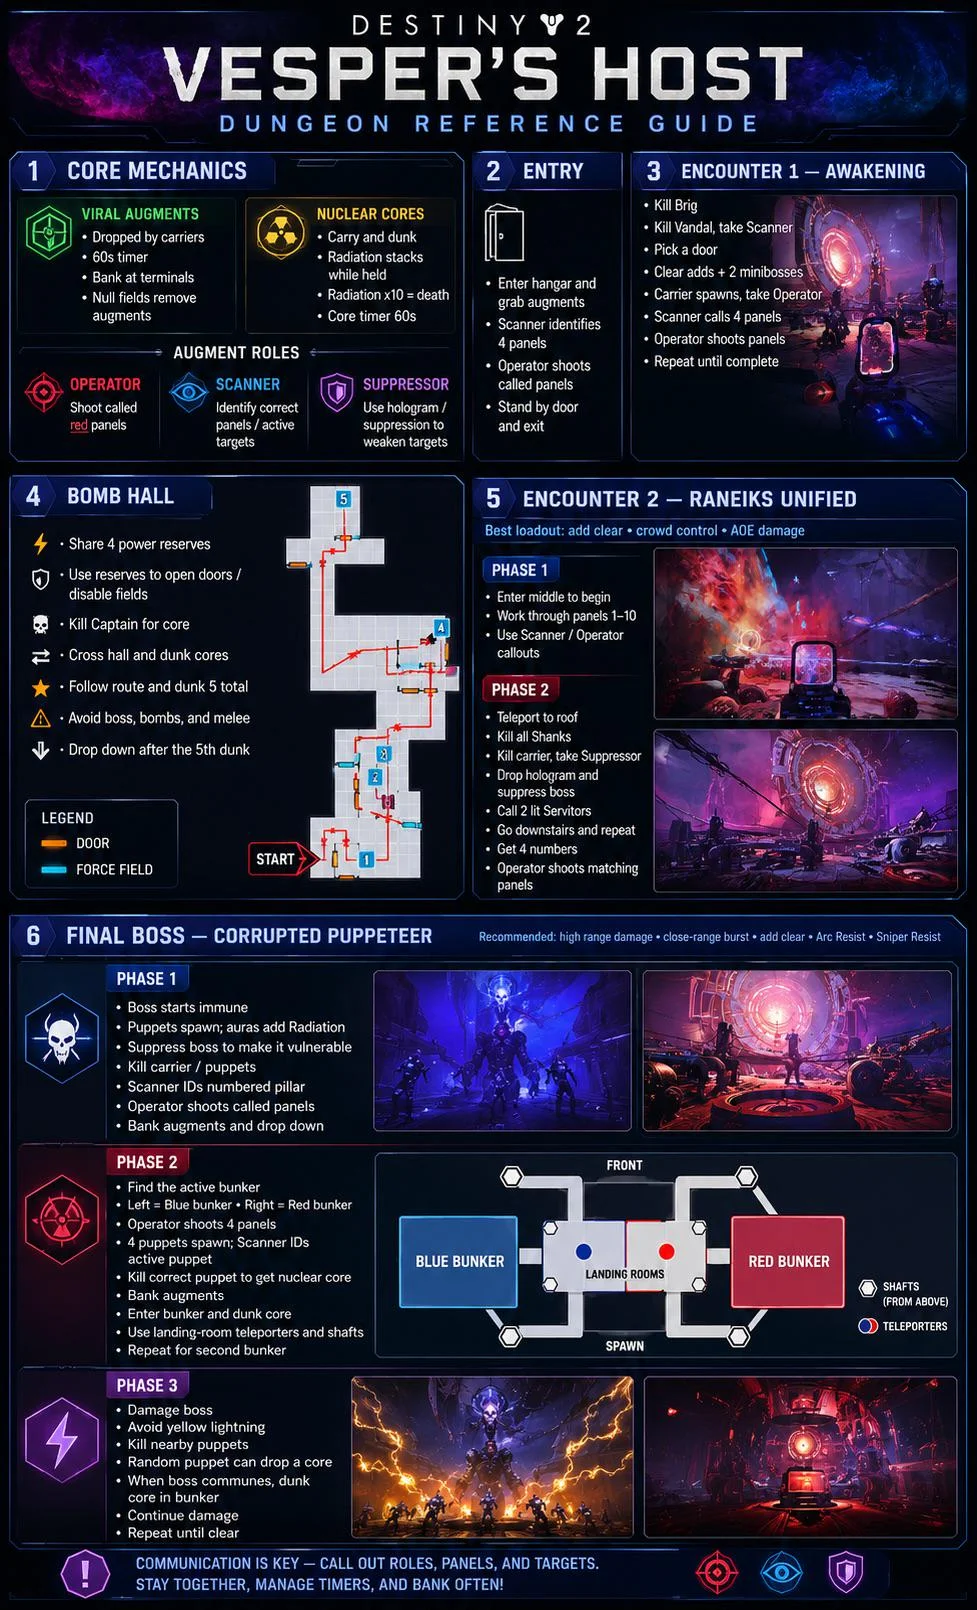
Activation
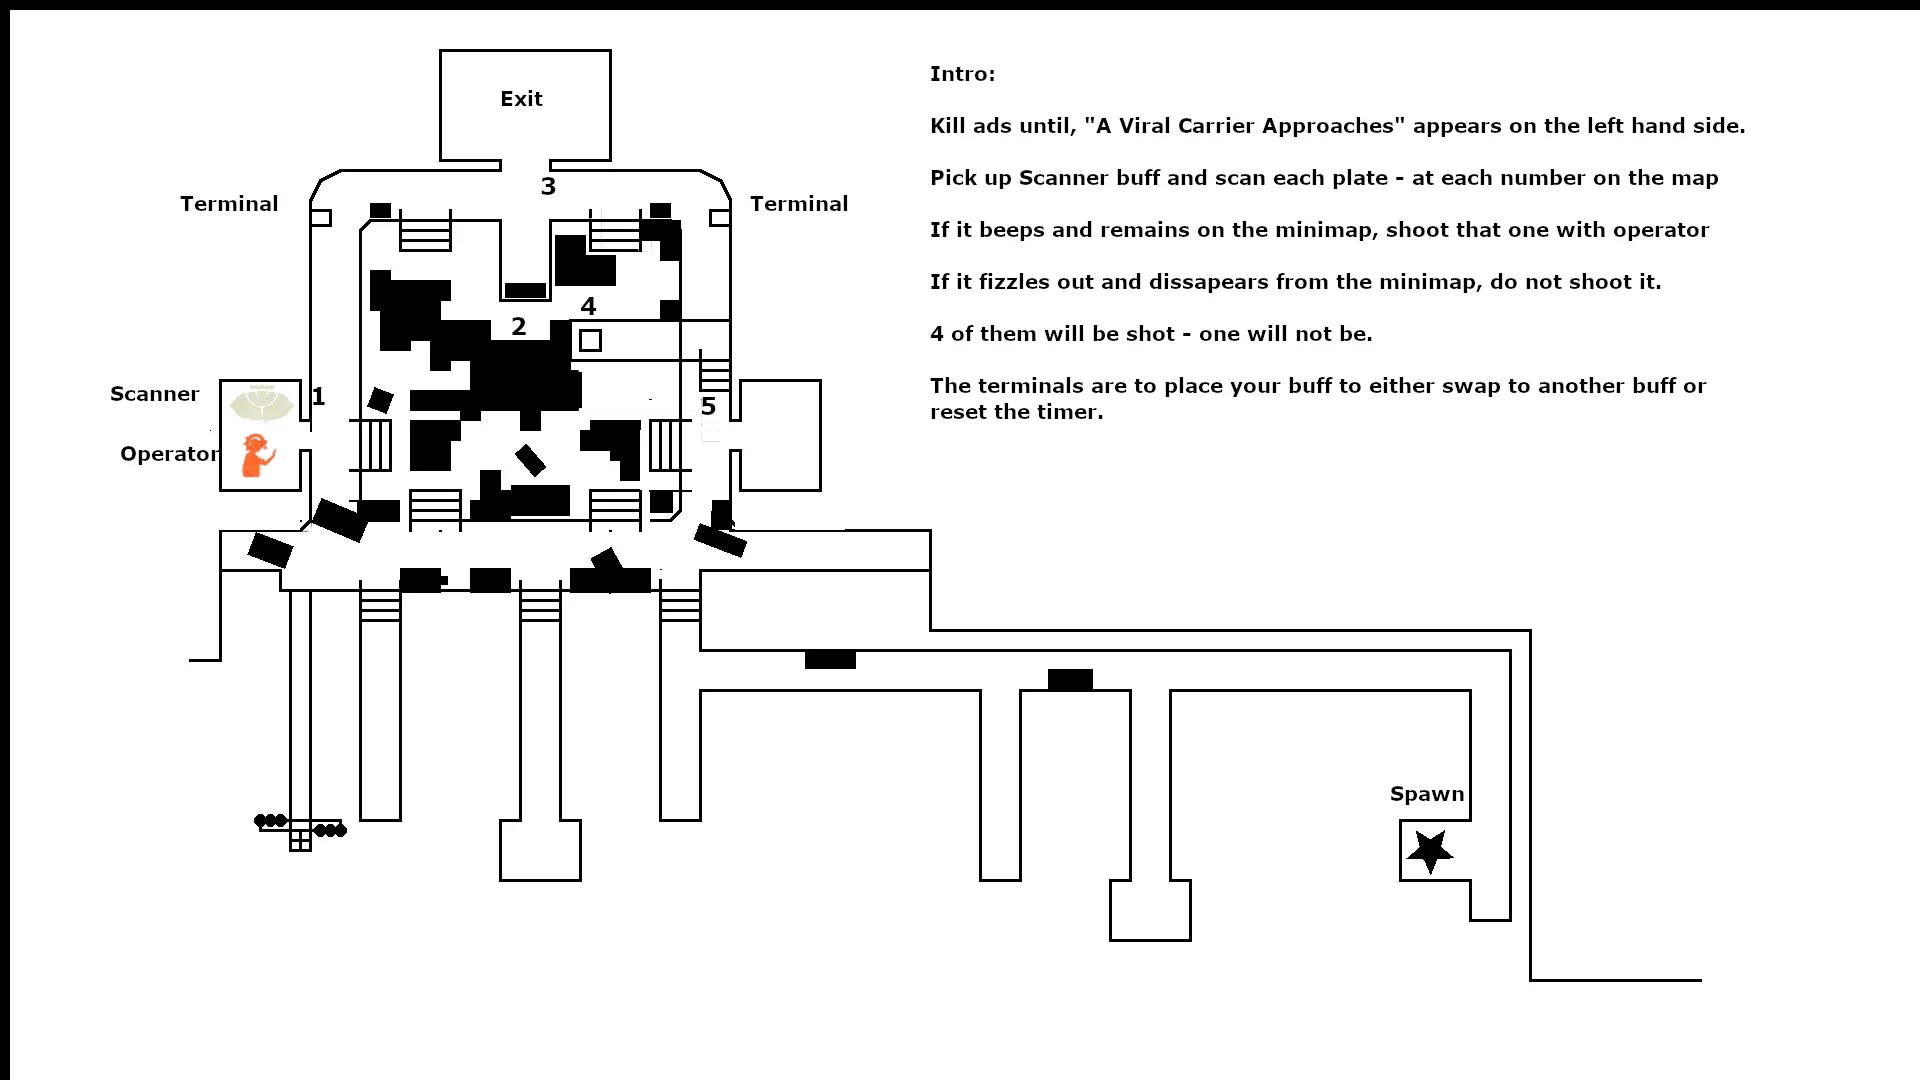
Integration
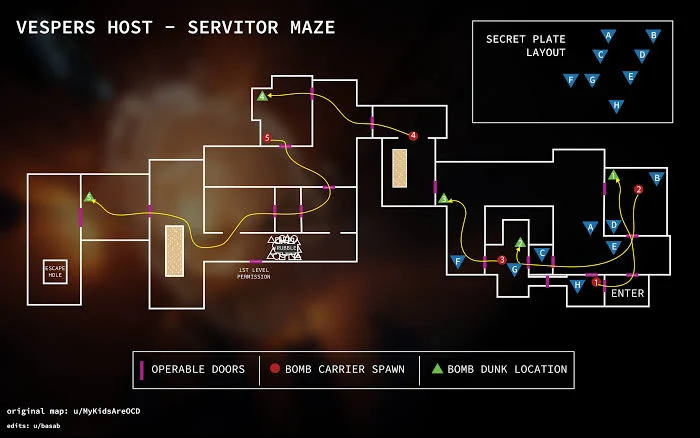
Raneiks Unified
No verified standalone encounter map has been sourced for this activity yet.
Corrupted Puppeteer — Observation and Control (Top Floor)
The starting room of the final boss. Use it to pre-assign wall buttons so the Operator is never hunting for a number mid-phase.
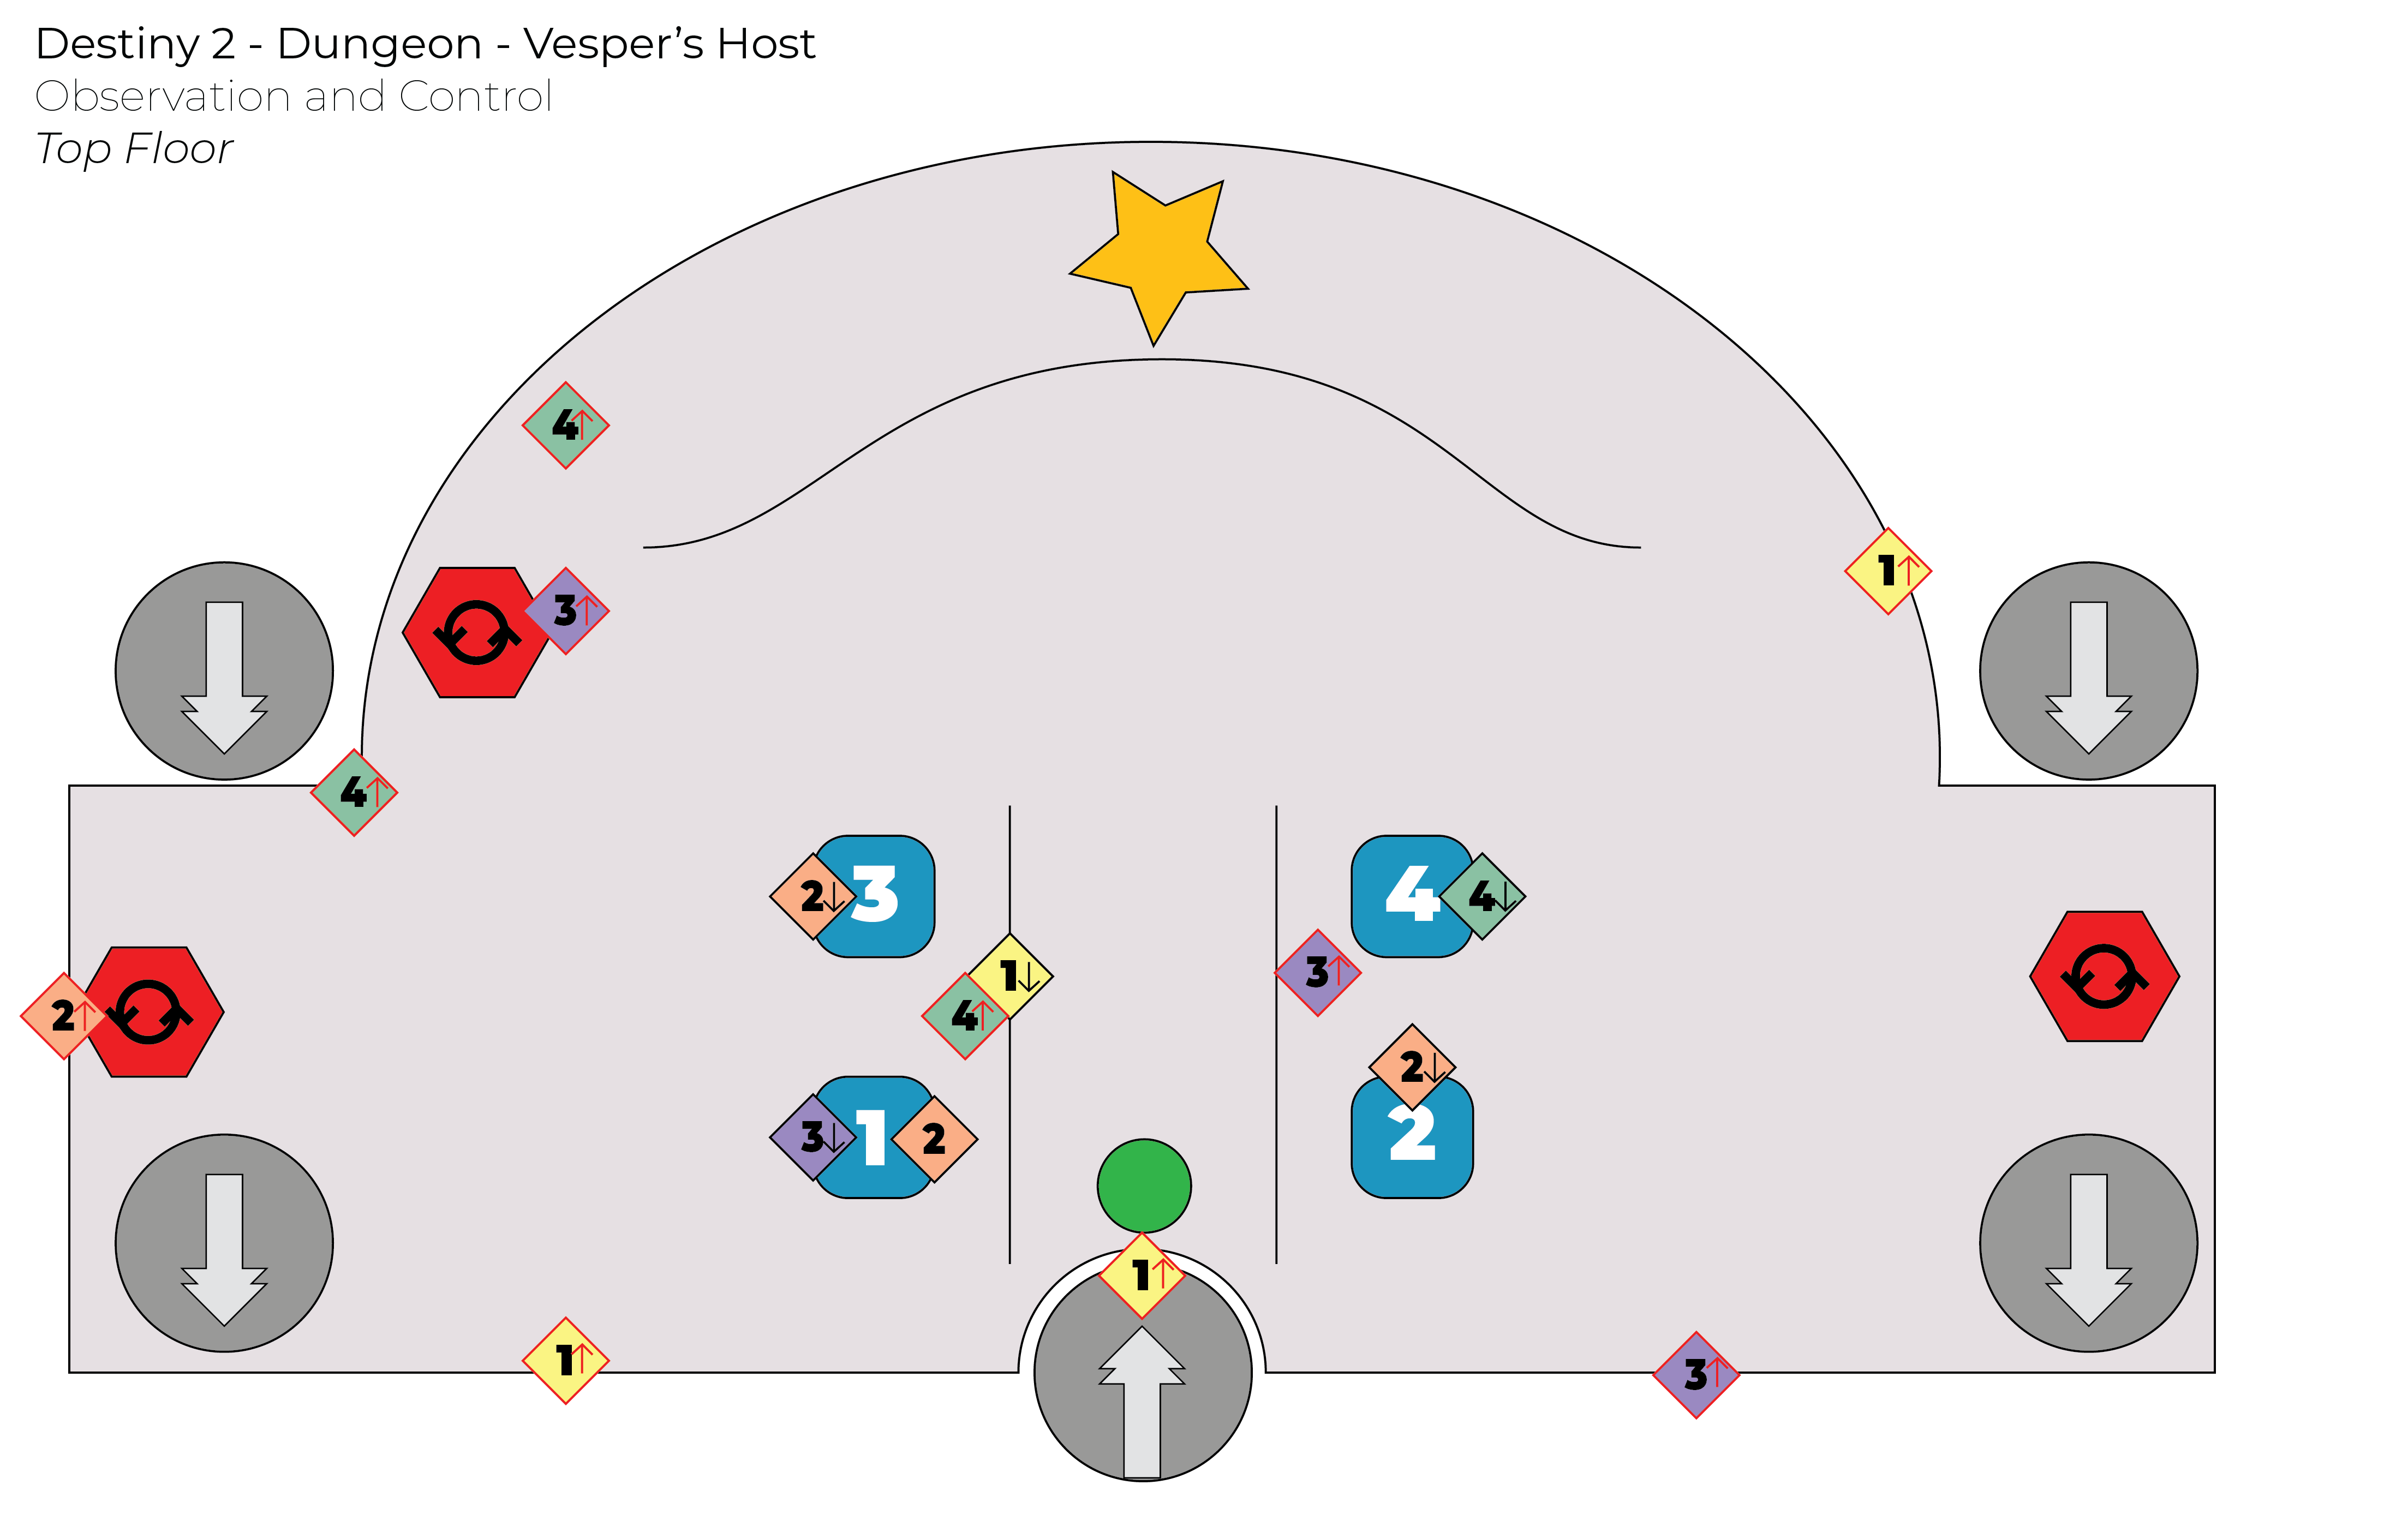
How to read it
- Blue squares 1–4 — the four numbered columns around the central platform. The Scanner checks each one; the column that blinks white is the number to call.
- Numbered diamonds (1↑, 3↓, etc.) — the wall buttons the Operator shoots. Every number has exactly four buttons; the arrow marks the button's vertical placement as drawn on the map, so call the number plus arrow ("three up") and the Operator can go straight to it.
- Red hexagons — augment (protocol) terminals.
- Grey circles — elevator shafts. The four corner shafts drop down to the shield-breaking rooms; the bottom-centre shaft is the one that launches the team back up.
- Star — the Anomaly end of the room, where the boss appears for damage.
Buttons cluster by side: most 1s sit along the bottom edge, 2s and 3s around the left column pair, 4s on the upper-left arc and right column. Give each player a side to cover and the Operator only has to sprint one direction per call.
Raneiks Unified and the lower Puppeteer floors have no verified standalone map yet. The Guide preserves those callouts in text.
Loot
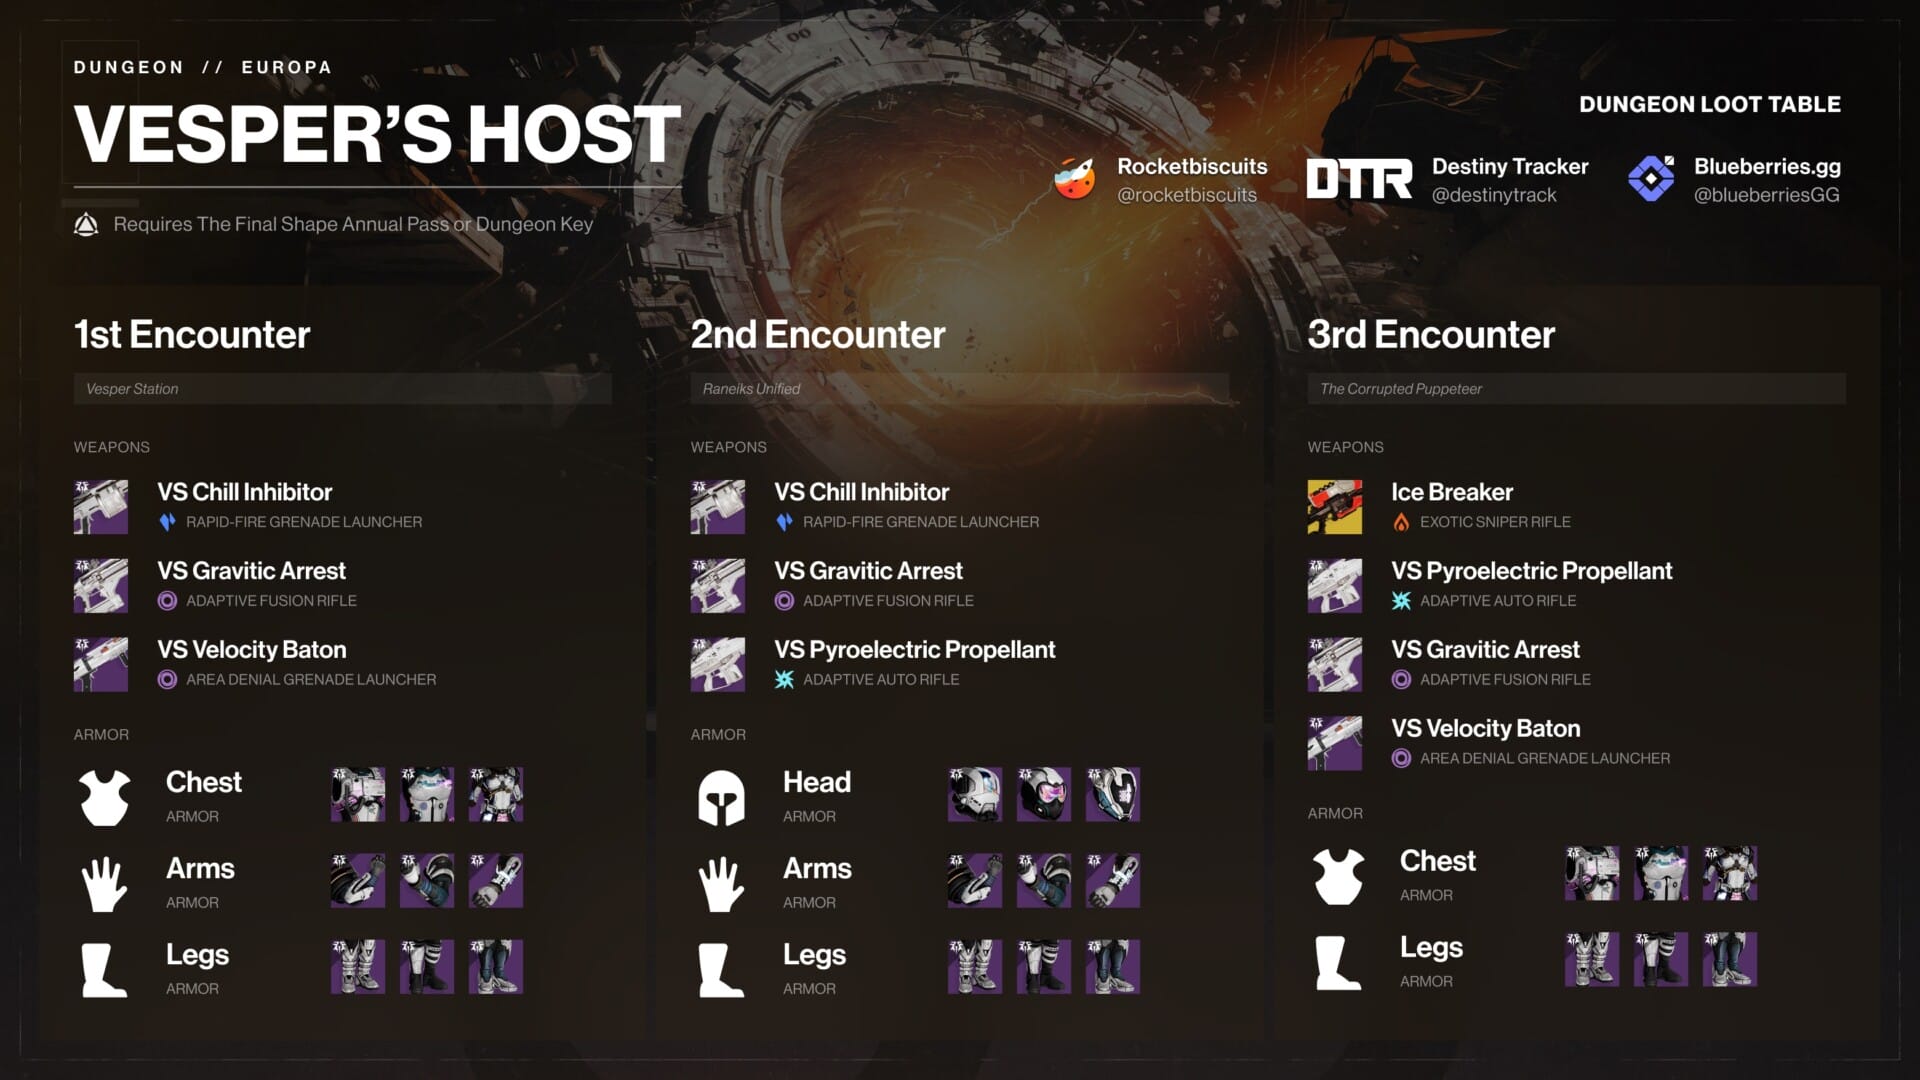
- Weapons: VS Pyroelectric Propellant, VS Gravitic Arrest, VS Velocity Baton, and VS Chill Inhibitor.
- Dungeon Exotic: Ice Breaker.
- Armor: Spacewalk sets for Hunter, Titan, and Warlock.
Secrets & Collectibles
Secret Chests
- During the servitor maze, after nuke 4 and before nuke 5. Requires Messages 1–3 to have been completed.
- Tripmine room. Requires Messages 1–6 to have been completed.
Track all messages, hidden chests, number puzzles, Rogue Network quest steps, and Ice Breaker catalyst requirements in one route.
Message Locations
Follow the Rogue Network quest from Spider while doing these — several messages have small intermediate steps beyond just reaching the location.
- Message 1 — In the first encounter area, inside the red heart room with 4 plates.
- Message 2 — Complete the first section of the maze (dunk the 3rd nuke first), then solve the puzzle in that first section.
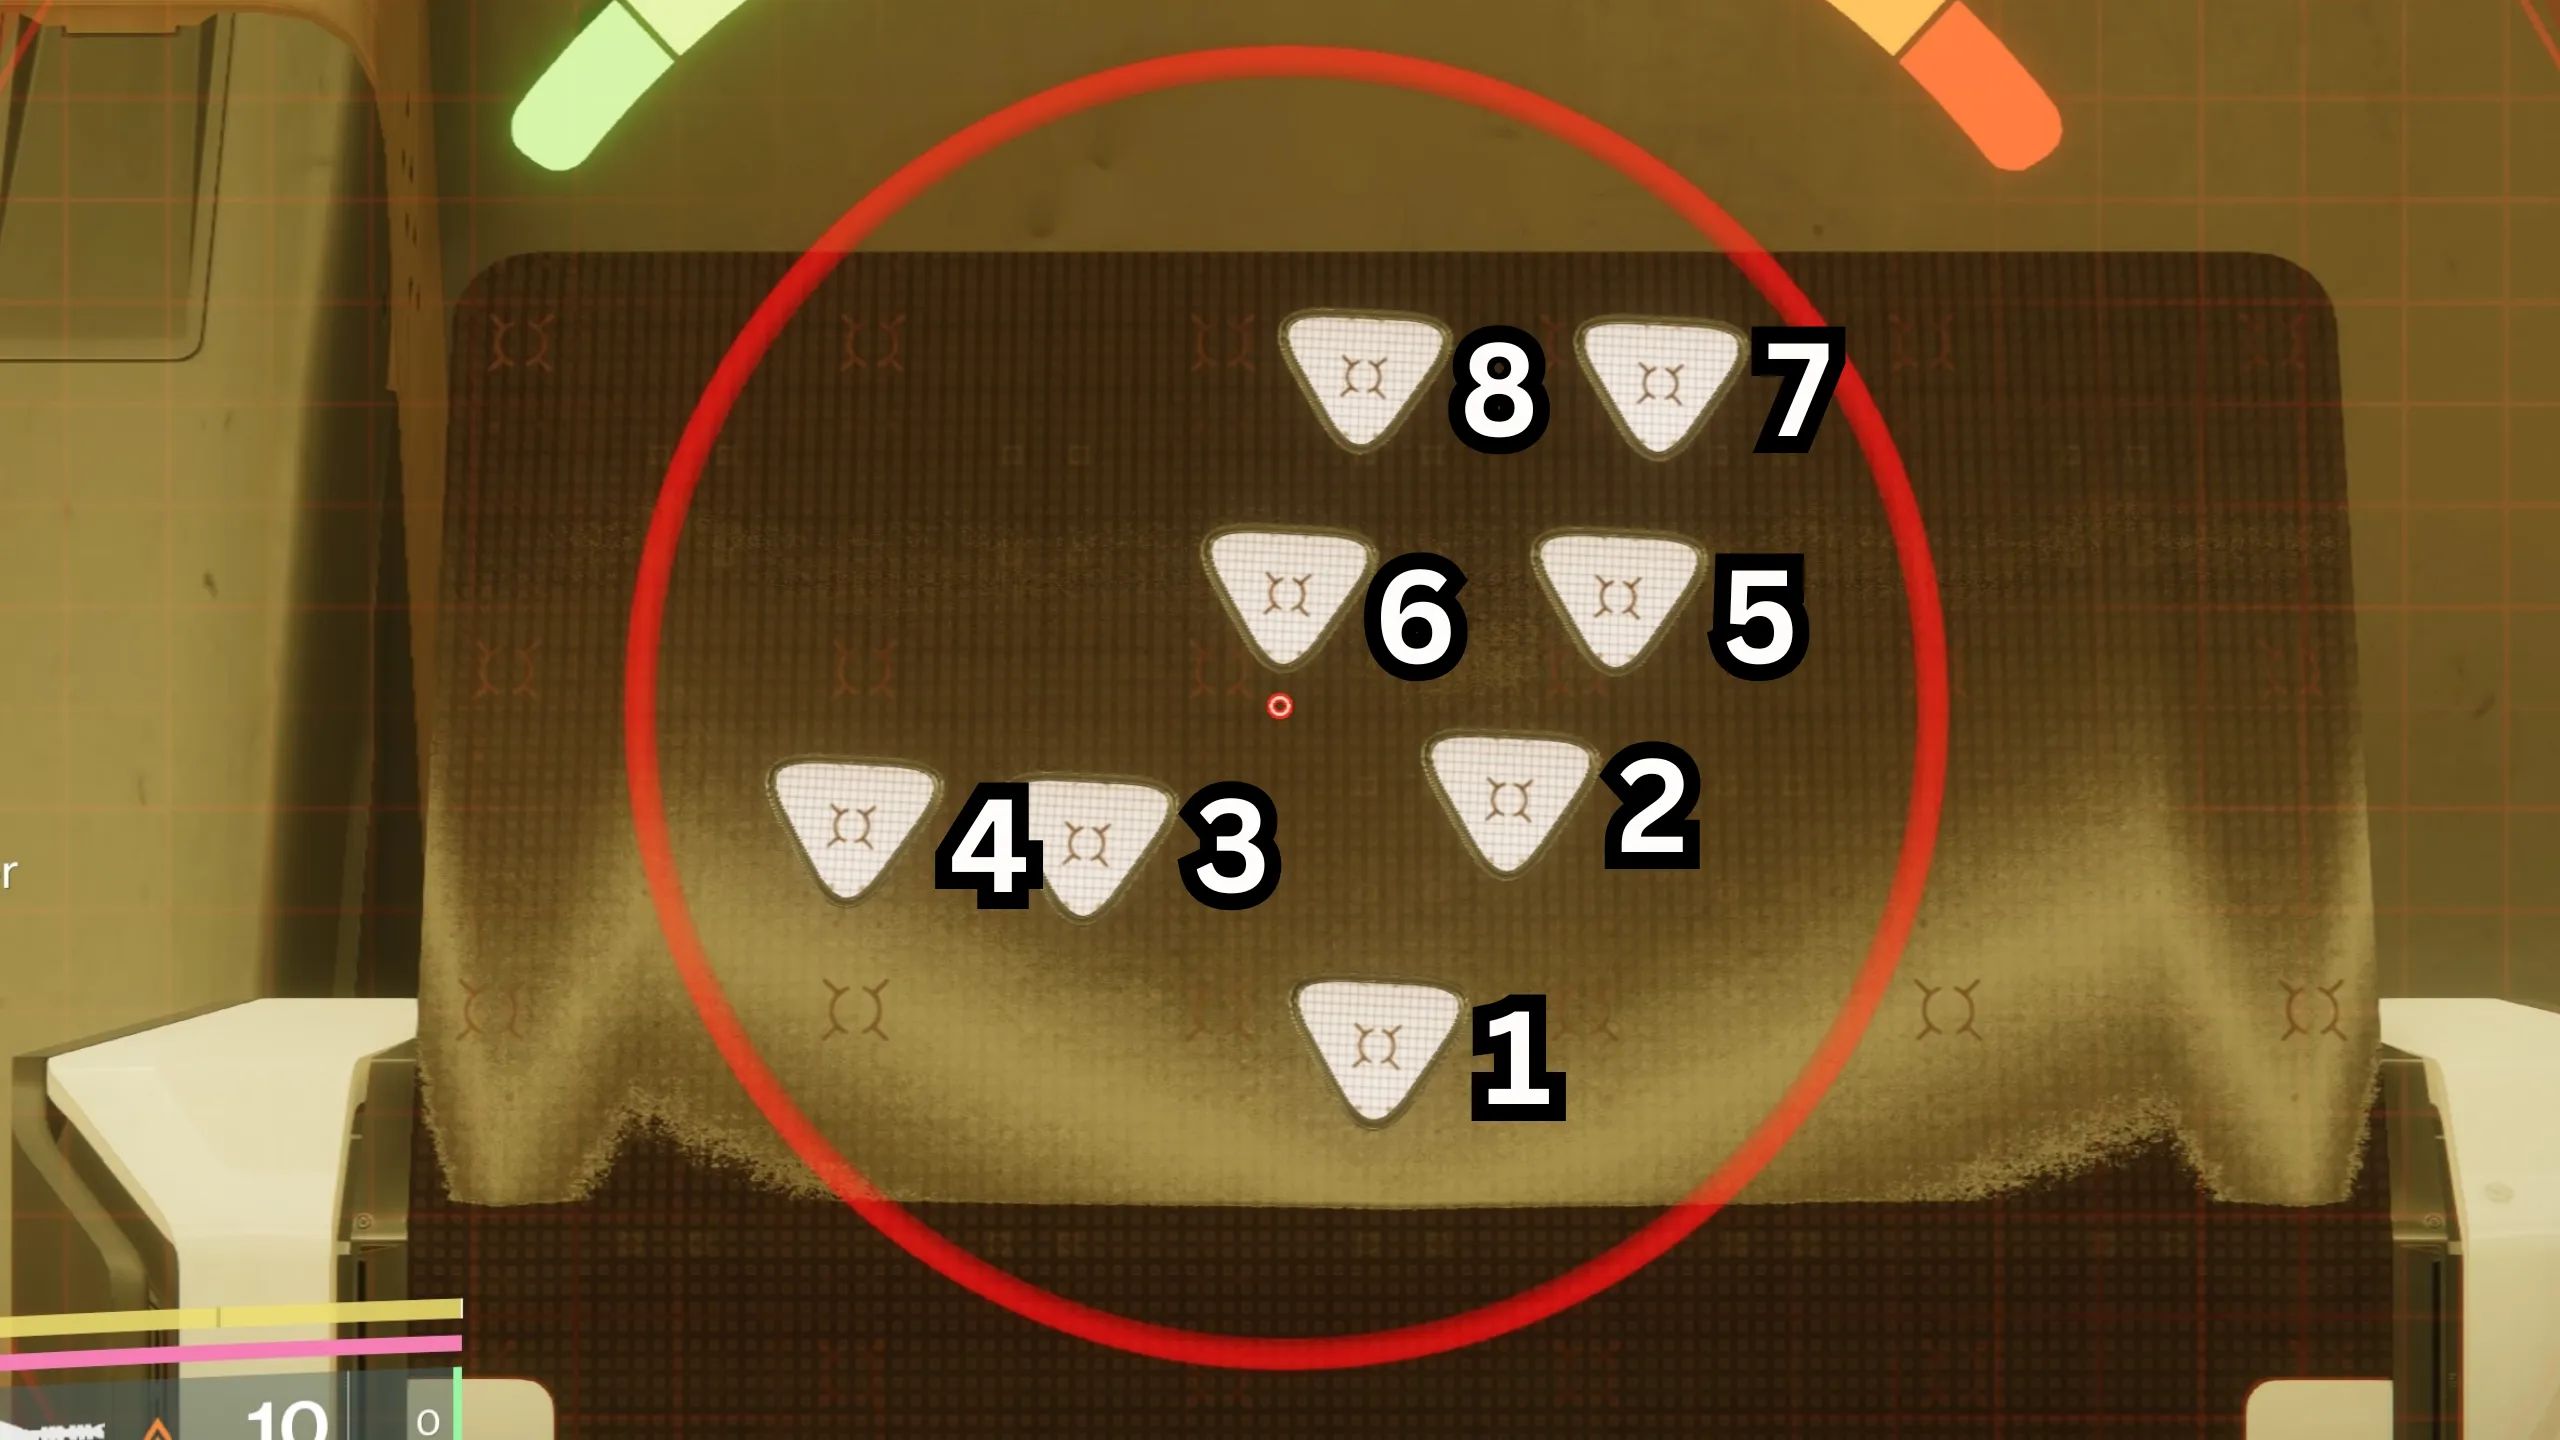
Message 2 — Plate NumbersBy Keen Gamer. Select to view full size. 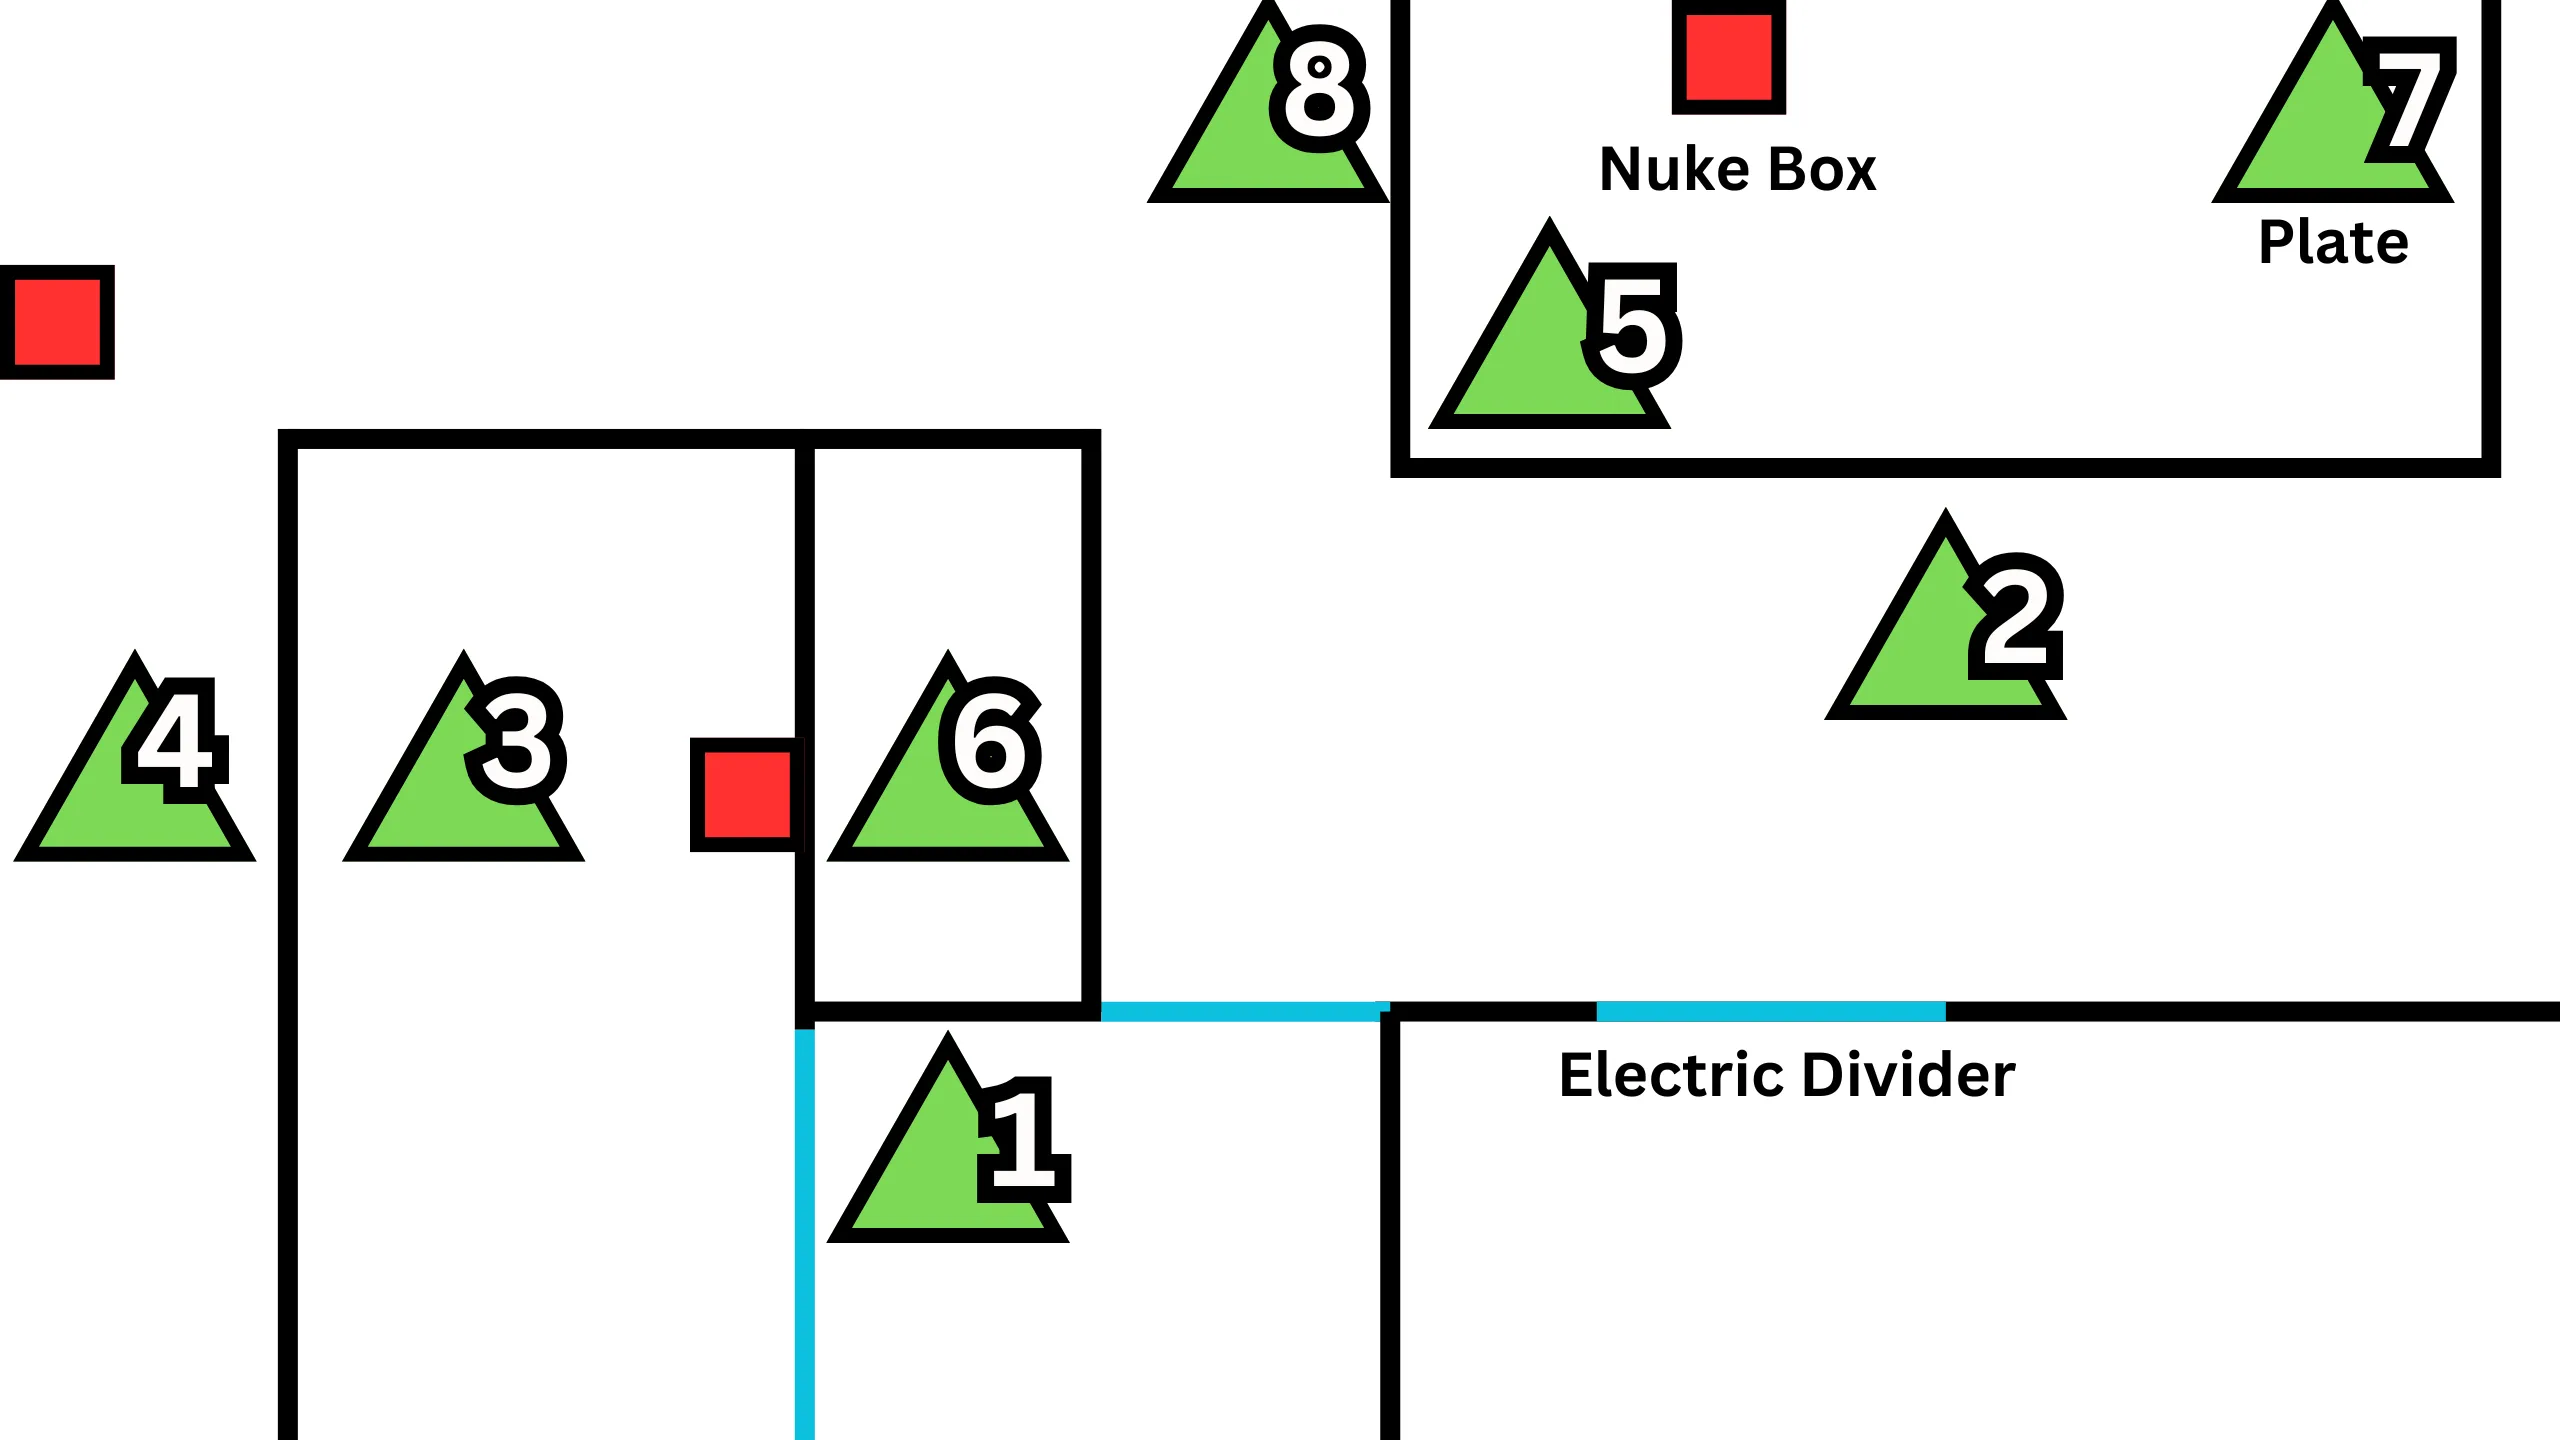
Message 2 — Plate MapBy Keen Gamer. Select to view full size. - Message 3 — After the second encounter, during the parkour section with lightning. Plate 3 is near the display screen. Completing Messages 1–3 unlocks the first secret chest.
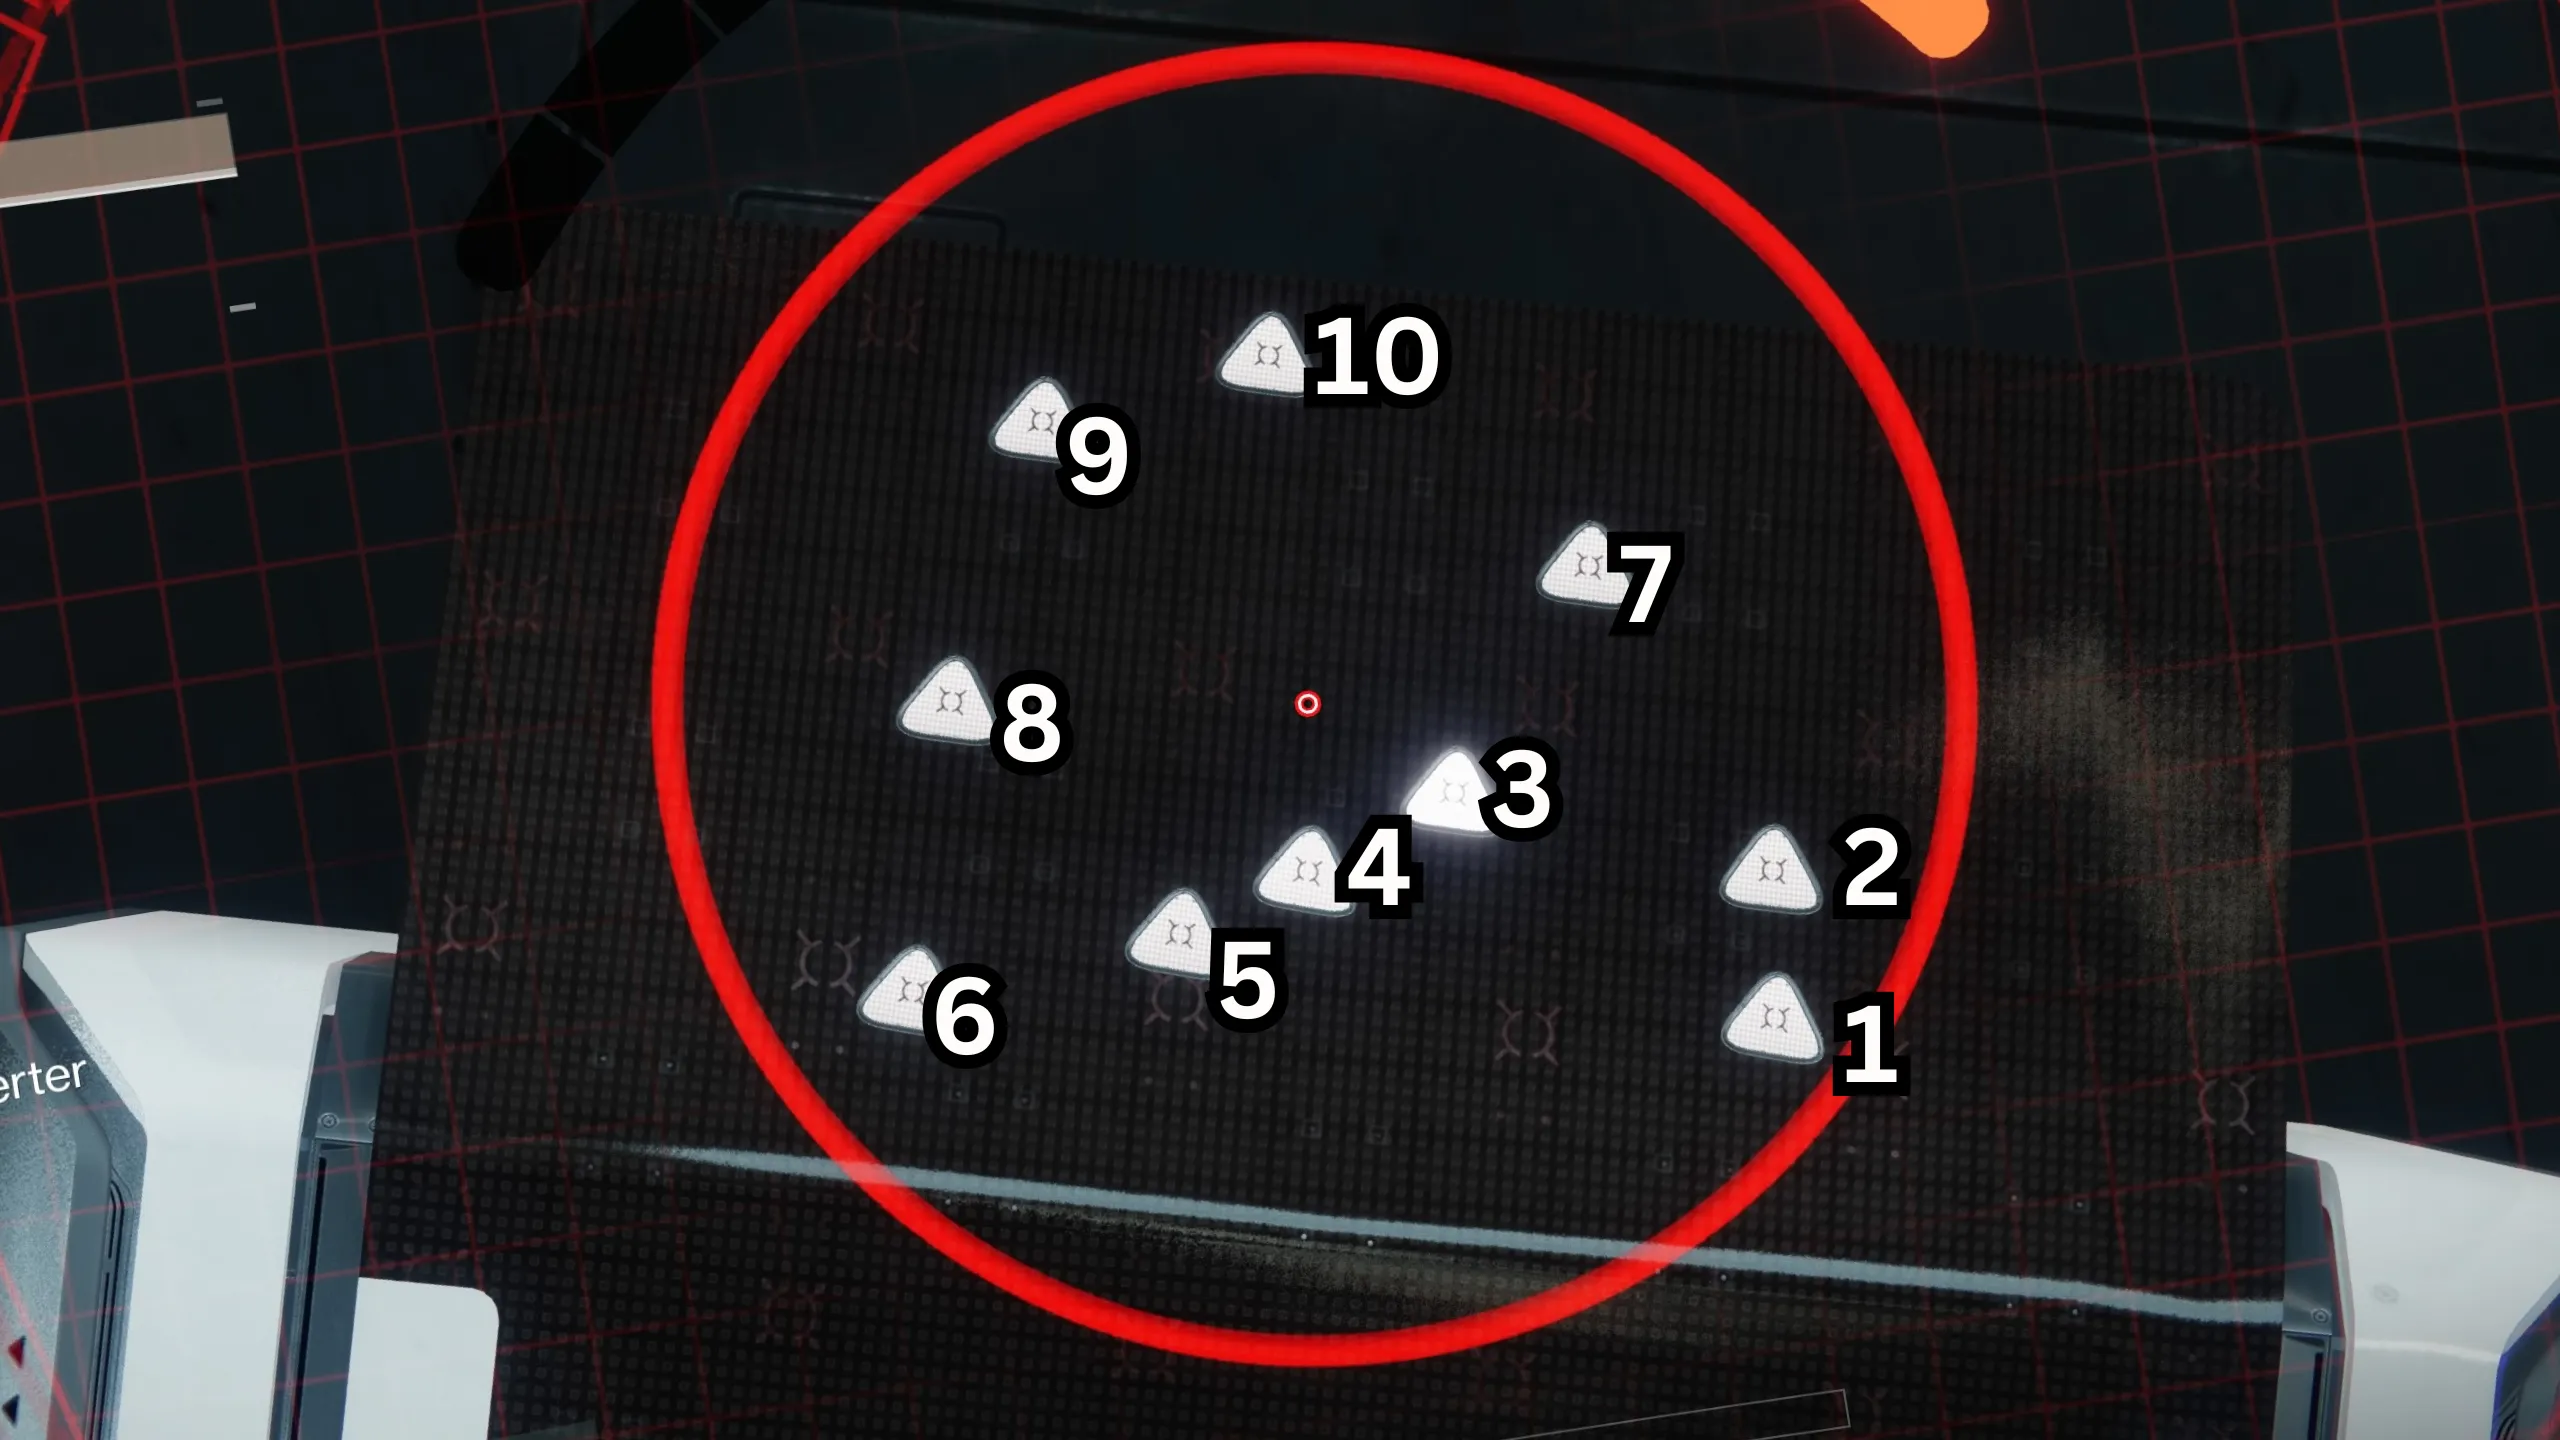
Message 3 — Plate NumbersBy Keen Gamer. Select to view full size. 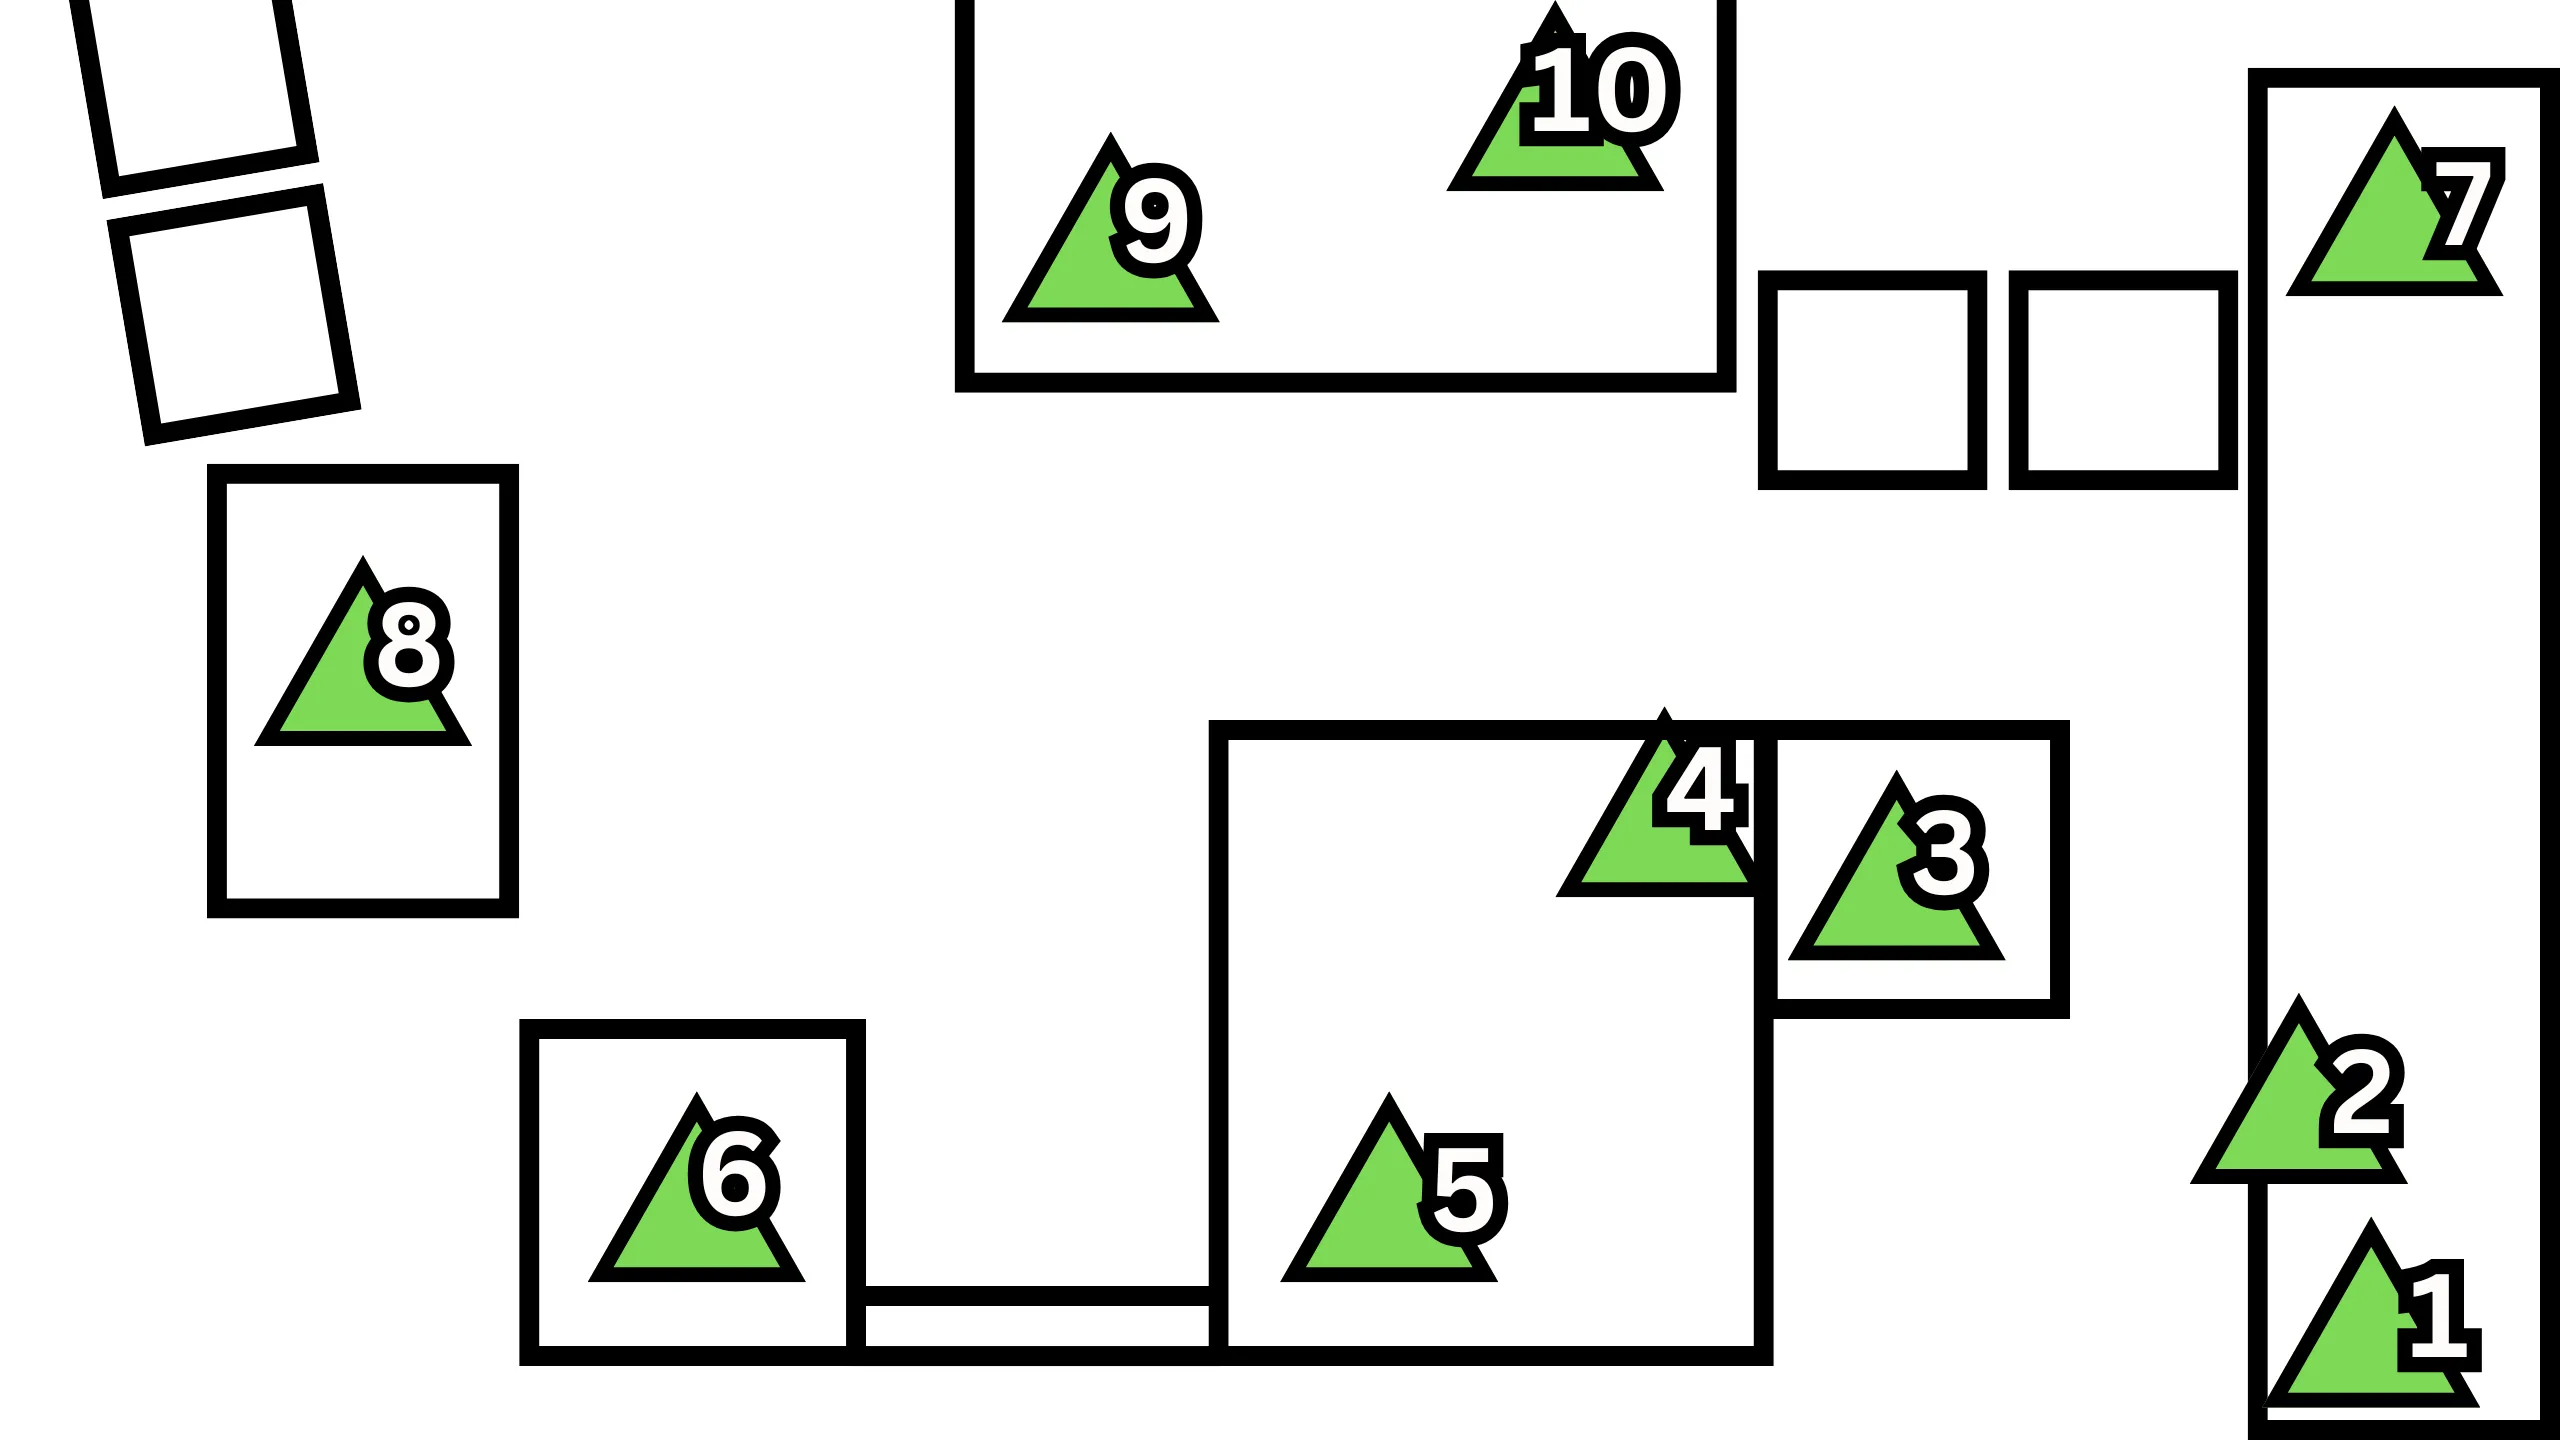
Message 3 — Plate MapBy Keen Gamer. Select to view full size. - Message 4 — In the first encounter area, inside the red heart room with numbers panels. Scanner is inverted in this section.
- Message 5 — After the second encounter, during the parkour section with the Brig. Find the terminals with Scanner and Operator and repeat the Message 4 mechanic.
- Message 6 — After the second encounter, during the parkour section with the lightning, after you defeat the Tech Priest. Repeat the Message 4/5 mechanic. Completing Messages 4–6 unlocks the second secret chest.
- Message 7 — In the first encounter area, inside the red heart room. Shoot panels that add up to the blue number. Puzzle calculator ↗
- Message 8 — After the servitor maze, shoot the numbers that multiply to the large blue number. Puzzle calculator ↗
- Message 9 — After the first spacewalk section, right before the tripmine room. Make two small blue numbers that multiply together to the big blue number. Puzzle calculator ↗
Rogue Network — the third message (map plates)
Rogue Network is the post-clear quest from Spider that unlocks the dungeon class item and opens the Ice Breaker catalyst. Its third message is the one fireteams stall on: a terminal in the jumping-puzzle section shows a flashing map symbol, and you have to stand on the matching plate somewhere in the area — ten plates, spread across the climb. The reference below pins all ten so nobody is hunting mid-puzzle.
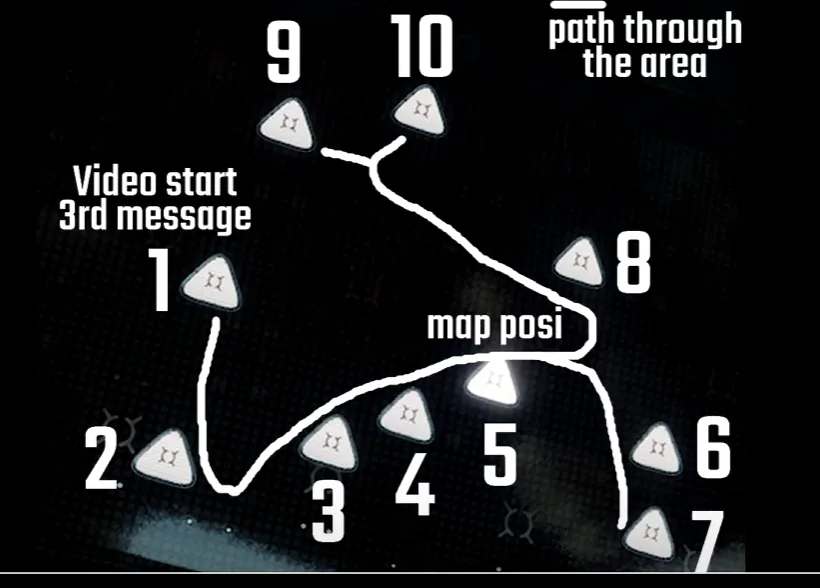
Plate locations
- Start of the jumping puzzle, on the normal path through it.
- Next platform along the puzzle.
- Next platform after that.
- Against the wall before the puzzle's initiation room.
- Inside the initiation room — the room whose map is shown on the terminal.
- On the solar panel to the right of 5, the one not facing the initiation room. (A spare, non-functional map floats in the air past 6 and 7 — ignore it.)
- The next solar panel over, facing the initiation room.
- Against the wall at the top of the beam.
- On top of the large machine to the left of the round door. There is an extra decoy map here too.
- Tucked in the dark to the right of the round door.
Split the plates three ways: one player covers 1–4, one covers 5–8, one covers 9–10. Plates 9 and 10 can pick up 8 as well, but those platforms take a lot of lightning — keep the third player mobile rather than parked.
Quest progress only counts for the player who opens the chest at the end of each message. Teammates need their own instance to progress.
Final Puzzle
Required for the Ice Breaker catalyst and weapon focusing. Pick up Operator and perform this sequence in order:
- Activate the Top Right.
- Enter 1-0-0-0 on the Top Left.
- Activate the Bottom Right.
- Enter 4-1-1-1-4 on the Top Right.
- Activate the Bottom Left.
- Enter 0-0-1-1 on the Bottom Right.
- Activate the Top Left.
- Enter 1 at the Bottom Left.
- Activate the Bottom Right.
- Enter 0-1-0-0 on the Top Left.
- Activate the Bottom Left.
- Enter 0-0-1-0 on the Bottom Right.
- Activate the Bottom Right.
- Enter 3 on the Bottom Left.
- Activate the Top Right.
- Enter 3 on the Bottom Left.
- Activate the Top Left.
- Enter 1-1-4 on the Top Right.
- Activate the Top Right.
- Enter 0-1-0-1 on the Top Left.
- Activate the Top Left.
- Enter 1-2-1-1-4 at the Top Right.
- Activate the Bottom Left.
- Enter 0-0-1-0 at the Top Left.
- Enter 0-1-1-1 at the Bottom Right.
Blueberries.gg Rogue Network guideAll seven message puzzles, start to class item →